1.1 Git 目录介绍 项目初始化
1
2
3
4
5
6
7
8
mkdir git_study cd git_study command not found
windows下的 git 没有 tree 命令,默认调用的是cmd的tree命令,而cmd 提供的 tree 命令比较特殊,并不是常见的 .exe 结尾文件,而是 .com 结尾的文件。去下载 tree-1.5.2.2-bin.zip,解压,然后将 tree-1.5.2.2-bin\bin\tree.exe 文件复制到git Bash 的安装目录下 Git\usr\bin 下,然后就能使用tree命令了:
1
2
3
4
5
6
7
8
9
10
11
12
13
14
15
16
17
18
19
20
21
22
23
24
25
26
27
$ tree .git
1.1.1 Git Config 不同级别的 Git 配置:system > global > local (按照级别高到低的顺序)。
每个级别的配置可能重复,但是低级别的配置会覆盖高级别的配置。
1.1.2 常见 Git 配置
1
2
3
4
git config --global user.name "yourname"
1
2
Git 命令别名配置1 2 "commit --amend --no-edit"
1.2 Git Remote
查看 Remote
添加 & 删除 Remote 仓库
1 2 3 4 5 git remote add repoName repoAddr
演示如下:
1 2 3 4 5 $ git remote add test_origin git@github.com:this/is/a_test.git
添加后,这个地址将同时用于pull和push操作,除非你明确地配置了不同的URL用于pull和push ,上面的fetch类似于pull,具体在后面会讲到 。
只能修改push 的 url
1 git remote set-url --push repoName url
演示如下:
1 $ git remote set-url --push test_origin https://github.com/another/repos/url.git
结果:
1 2 3 $ git remote -v
也可以通过cat .git/config 来查看远程仓库的配置,经过上述操作,然后可以看到以下三个远程仓库信息:
1 2 3 4 5 6 7 8 9 10 11 12 13 $ cat .git/configfalse false true false true "test_origin" ]
1.3 Git Add 通过git add命令将文件添加到缓冲区。
1 2 3 4 5 6 7 8 9 10 11 12 13 14 15 16 17 18 19 20 21 22 23 24 25 26 27 28 29 30 Ace@MacBook-Air-15 MINGW64 /d/git_study (main)touch readme.md"git add <file>..." to include in what will be committed)"git add" to track)"git rm --cached <file>..." to unstage)
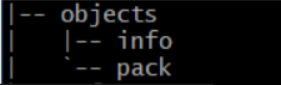
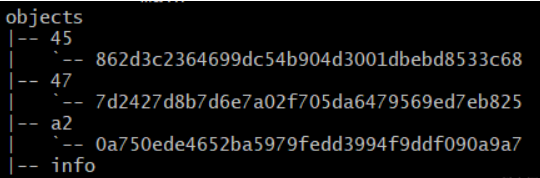
查看.git目录结构,发现objects增加了一些内容
前
后
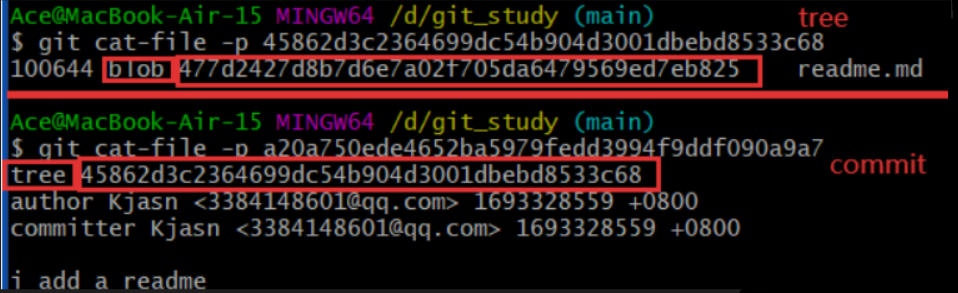
通过文件的id查看文件内容:
1 2 $ git cat-file -p 477d2427d8b7d6e7a02f705da6479569ed7eb825
1.4 Git Commit 通过git commit命令提交。
1 git commit -m "description"
提交上面创建的 readme.md,之后会发现object目录下多了两个 文件(45和a2开头的id):
下面会讲到
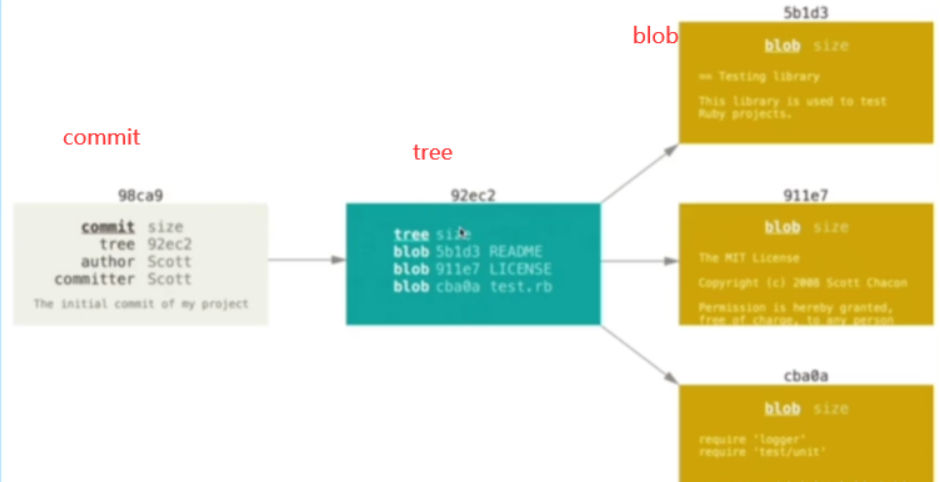
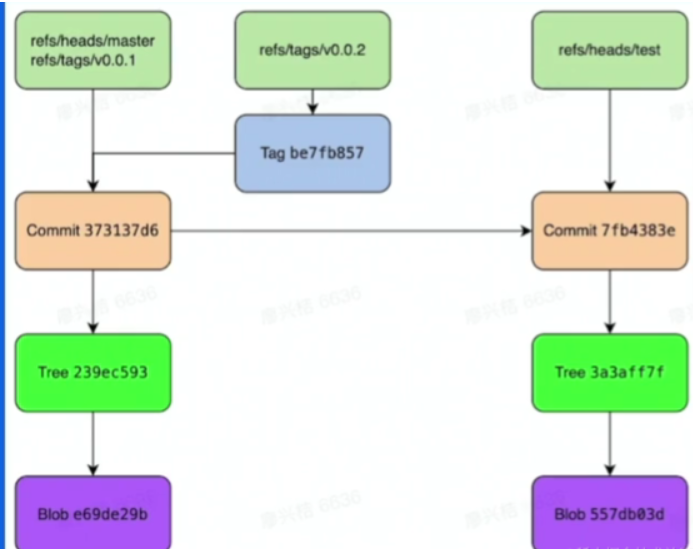
1.5 object object(对象)是Git的基本数据单元,用于存储和管理项目的内容。
Git中有四种主要类型的对象,它们分别是:
Blob 存储文件的内容
Tree 存储同一次提交的所有文件的目录信息,每次不同的提交都会创建不同的tree对象。
Commit 存储提交信息,一个 Commit 可以对应唯一版本的代码,即每次提交都会有一个commit。
Tag (后面会再次提到)
关联如下图:
通过 Commit 寻找到 Tree 信息,每个 Commit 都会存储对应的 Tree ID.
通过 Tree 存储的信息,获取到对应的目录树信息。
从 Tree 中获得 Blob 的 ID, 通过 Blob ID 获取对应的文件内容。
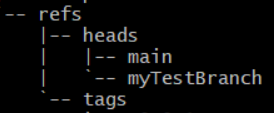
1.6 refs 1 git chechout -b branchName
创建myTestBranch分支之后,refs目录下多出了一个文件,且它们的内容都是一样的,即refs 的内容就是对应的 Commit ID ,因此把 refs 当做指针,指向对应的 Commit 来表示当前 refs 对应的版本。
1 2 3 4 5 6 7 8 9 10 11 12 13 14 15 Ace@MacBook-Air-15 MINGW64 /d/git_study (main)cat .git/refs/heads/main'myTestBranch' already exists'myTestBranch' cat .git/refs/heads/myTestBranch
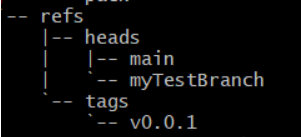
不同种类的 refs
refs/heads前缀表示的是分支,除此之外还有其他种类的 refs, 比如 refs/tags 前缀表示的是标签。
head git checkout -b BranchName # 创建一个新分支,其中 -b 表示切换分支,分支一般用于开发阶段,是可以不断添加 Commit 进行迭代的。
tag 标签一般表示的是一个稳定版本,指向的 Commit 一般不会变更,可通过 git tag 命令生成 tag.
创建 tag v0.0.1
1.7 追溯历史版本
先用git log查看当前版本的 commit ID,然后查看commit,找到 parent 字段:
1 2 3 4 5 6 7 8 9 10 11 12 13 14 15 16 17 18 19 20 21 Ace@MacBook-Air-15 MINGW64 /d/git_study (myTestBranch)log
1.8 修改历史版本
git commit –amend修改之后 commit id 会变 ,tree ID 和 parent 字段不变。
原来的commit对象仍然存在,但是没有 refs 指针指向它,变成了 悬空的commit
演示:
修改最近一个commit,commit ID 更新了:
1 2 3 4 5 6 7 8 9 10 11 12 13 14 15 16 17 18 19 20 21 22 Ace@MacBook-Air-15 MINGW64 /d/git_study (myTestBranch)log
与修改之前的commit对比,tree和parent没变:
前:
1 2 3 4 5 6 7 8 Ace@MacBook-Air-15 MINGW64 /d/git_study (myTestBranch)then i commit test.txt
后:
1 2 3 4 5 6 7 8 9 Ace@MacBook-Air-15 MINGW64 /d/git_study (myTestBranch)
git rebase
合并 commit
修改具体的 commit message
删除某个 commit
git filter –branch
1.9 完整的 Git 视图
1.10 Git Clone & Pull & Fetch
Clone
1.11 Git Push Push 是将本地代码同步至远端的方式。
常用命令:
1 git push repoName branchName
冲突问题:git push origin master -f 来完成强制推送,一般不推荐主干分支进行该操作,正常都应该解决冲突后再进行推送。
推送规则限制:
2.1 分支管理工作流 分支管理工作流有:Git Flow ,Github Flow 和 Gitlab Flow (不过多说明)
以下以Github 工作流作为演示。
在GitHub新建一个仓库用于学习测试,然后复制仓库地址(http,ssh)都可以。
1 2 3 $ git clone https://github.com/kjasn/git_test.git 'git_test' ...
克隆的仓库存放在当前目录下的 git_test 目录下,切换到仓库目录下 ,随便创建一个文件用来演示提交。
1 2 3 4 Ace@MacBook-Air-15 MINGW64 /d/git_study/git_test (test )cat readme.md
1 2 3 4 5 6 7 8 9 10 11 12 13 14 15 16 17 18 19 Ace@MacBook-Air-15 MINGW64 /d/git_study/git_test (test )in the working copy of 'readme.md' , LF will be replaced by CRLF the next time Git touches ittest )"add readmeme~" test 9471dd3] add readmeme~test )test done .done .done .test -> test
然后在Github仓库页面刷新后 可以看到新添加的readme文件。
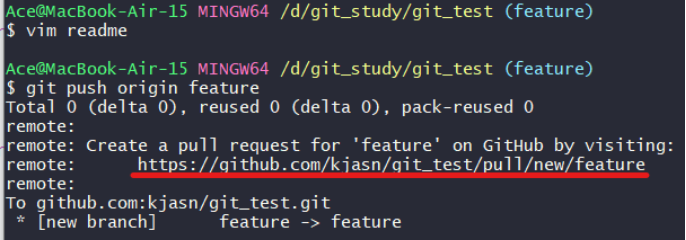
新建一个Feature分支:
push之后,自动创建了一个向main分支合并的pull request
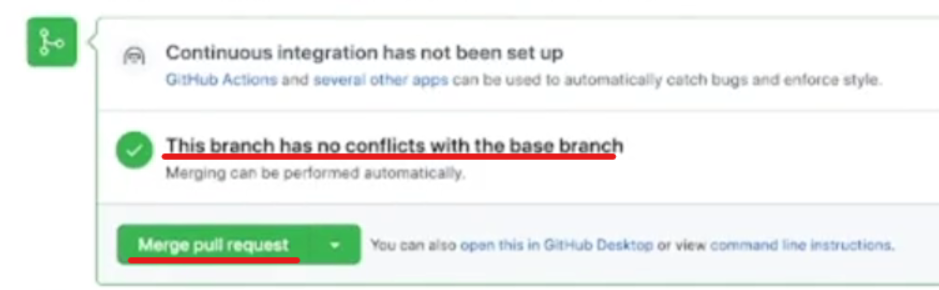
在Feature分支更新readme文件然后push(图中链接)。访问链接可以查看提交的代码变更,是否与main分支有冲突,解决冲突后可以选择是否与main分支合并 。
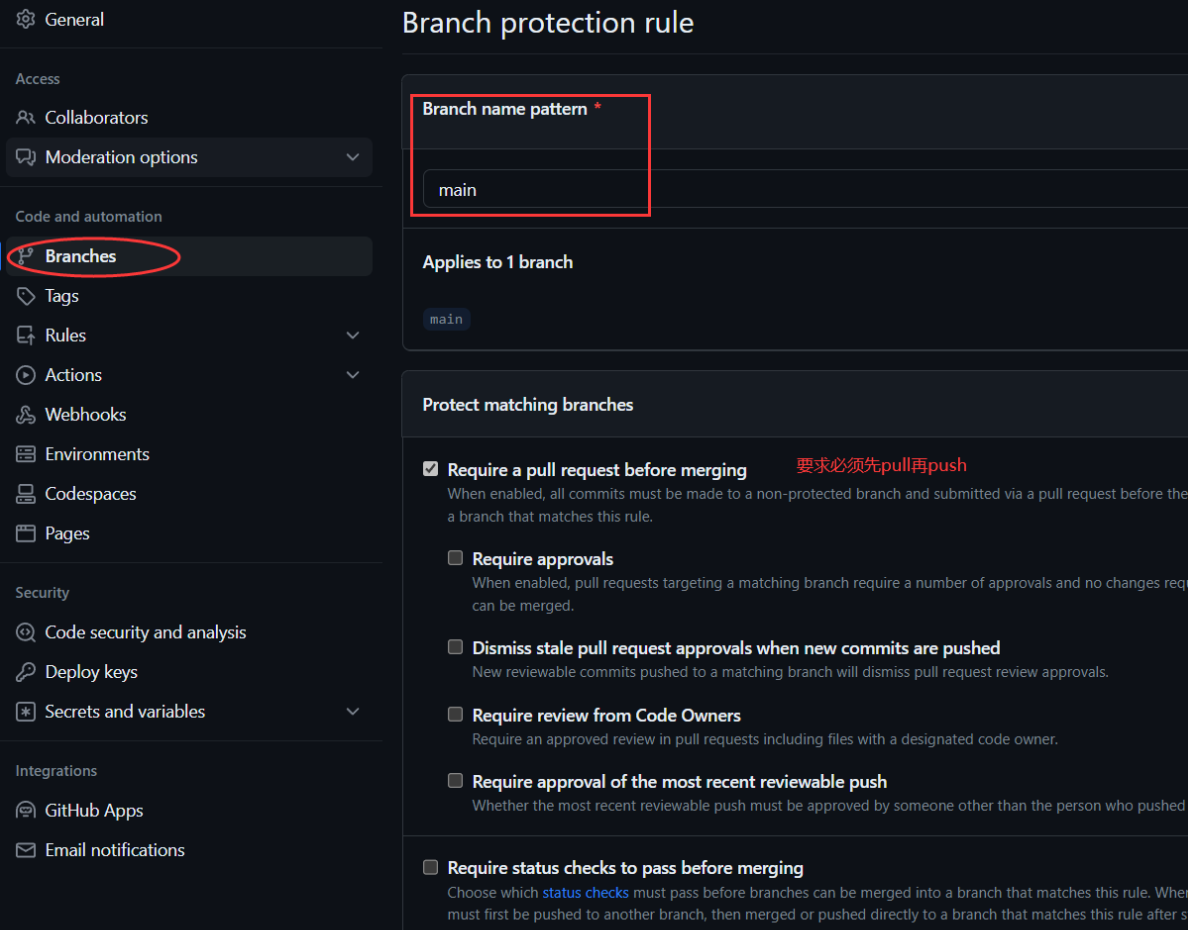
设置main分支保护,以防错误的提交代码影响到main分支:
演示更新提交,然后直接push,失败:
1 2 3 4 5 6 7 8 9 10 11 12 13 $ git push origin maindone .done .done .done .local object.for refs/heads/main.'github.com:kjasn/git_test.git'
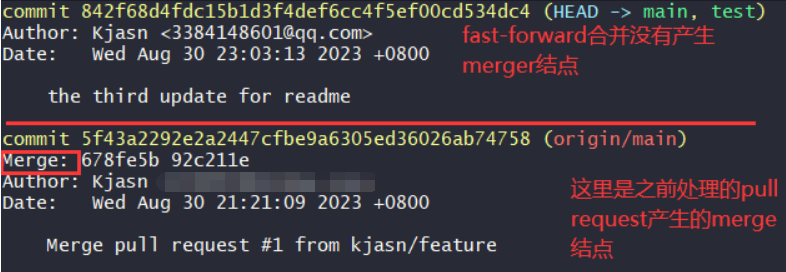
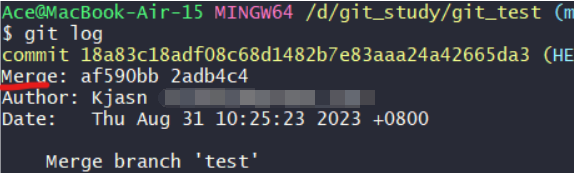
2.2 代码合并
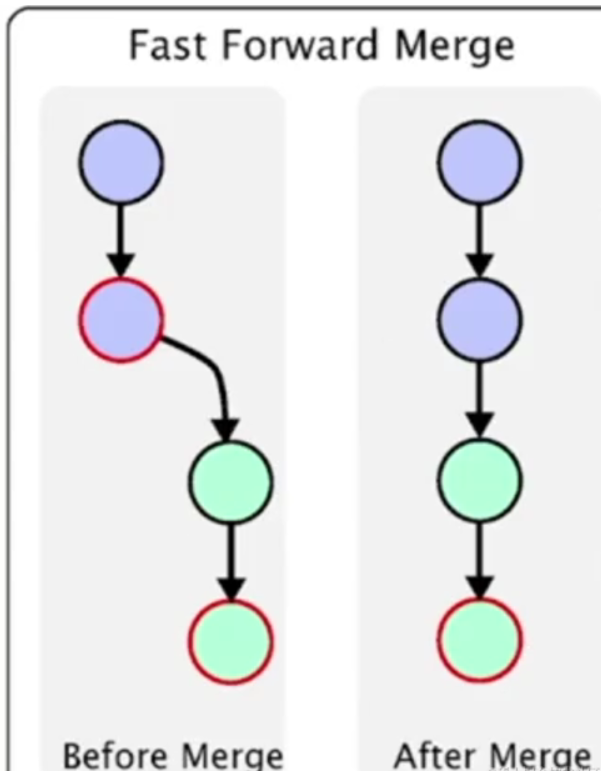
不会产生一个 merge 节点,合并后保持一个线性历史,如果 target 分支有了更新,则需要通过 rebase 操作更新source branch 后才可以合入。图示:
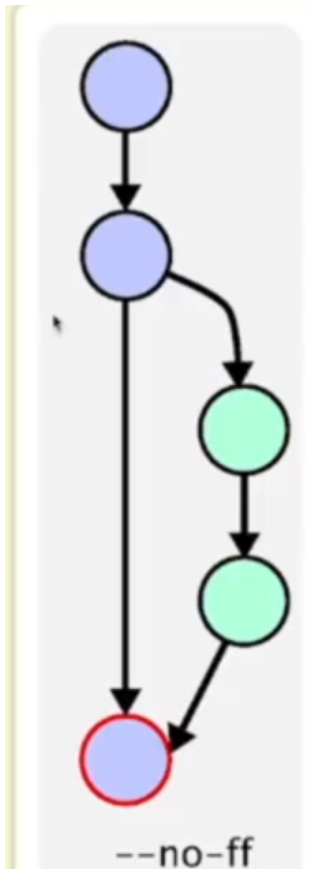
三方合并,会产生一个新的 merge 节点。图示:
Fast-Forward
不会生成merge结点
Three-Way Merge
2.3 选择合适的工作流
没有最好的,只有最合适的
针对小型团队合作,推荐使用 Github 工作流即可
尽量保证少量多次 ,最好不要一次性提交上千行代码提交 Pull Request 后最少需要保证有 CR 后再合入
主干分支尽量保持整洁,使用 fast-forward 合入方式,合入前进行 rebase
大型团队合作,根据自己的需要指定不同的工作流,不需要局限在某种流程中。
写在最后 参考:git 入门教程之 git bash 竟然不支持 tree 命令 - 雪之梦技术驿站 - 博客园 (cnblogs.com)